How to Start and Make Your OnlyFans Page Easily
After you’ve been approved by the site, you can get the account page setup quickly with this guide

OnlyFans How To Guides – How to Start an OnlyFans: Last Updated: June 5, 2021 Reading Time: 4 Minutes
7 Steps to Set Up Your OnlyFans Account Quickly in 10 Minutes or Less
Pick your OnlyFans Username and Display Name – 1 Minute
Quick Tip: Yes you can change your user name in the future but you don’t want to because you’ll be putting this link out everywhere (OnlyFans will forward your old page to your new page if you make this change later). Take the time while you’re being approved by the site to think of this name. Check out our Podcast “Optimizing your OnlyFans Username for Success” for more tips on this. Make the name something you can both spell out loud and remember easily when typing.
Enter your Display Name: You can change this at anytime with little effect. So don’t worry about it for now. Just put in something that makes sense that fits with your user name.
2. Add Your Bio Picture — 1 minute
Quick Tip: Your bio picture is one of the few visuals that can be seen in front of your pay wall. You want to make sure that your face is clearly visible here. Don’t use a full picture of your body or body parts no matter how flattering the picture looks big, it is likely to look terrible small. Plus people relate best to people’s faces and they will want to see yours unless you are planning on staying anonymous on the platform.
Upload Your Bio Picture: Go ahead and go into Edit Profile and upload a picture for your profile. The profile picture should be 400 height by 400 width, same as your Twitter picture. If you have tested this picture out previously on Twitter it will look generally the same on OnlyFans.
3. Add Your Banner – 3 minutes
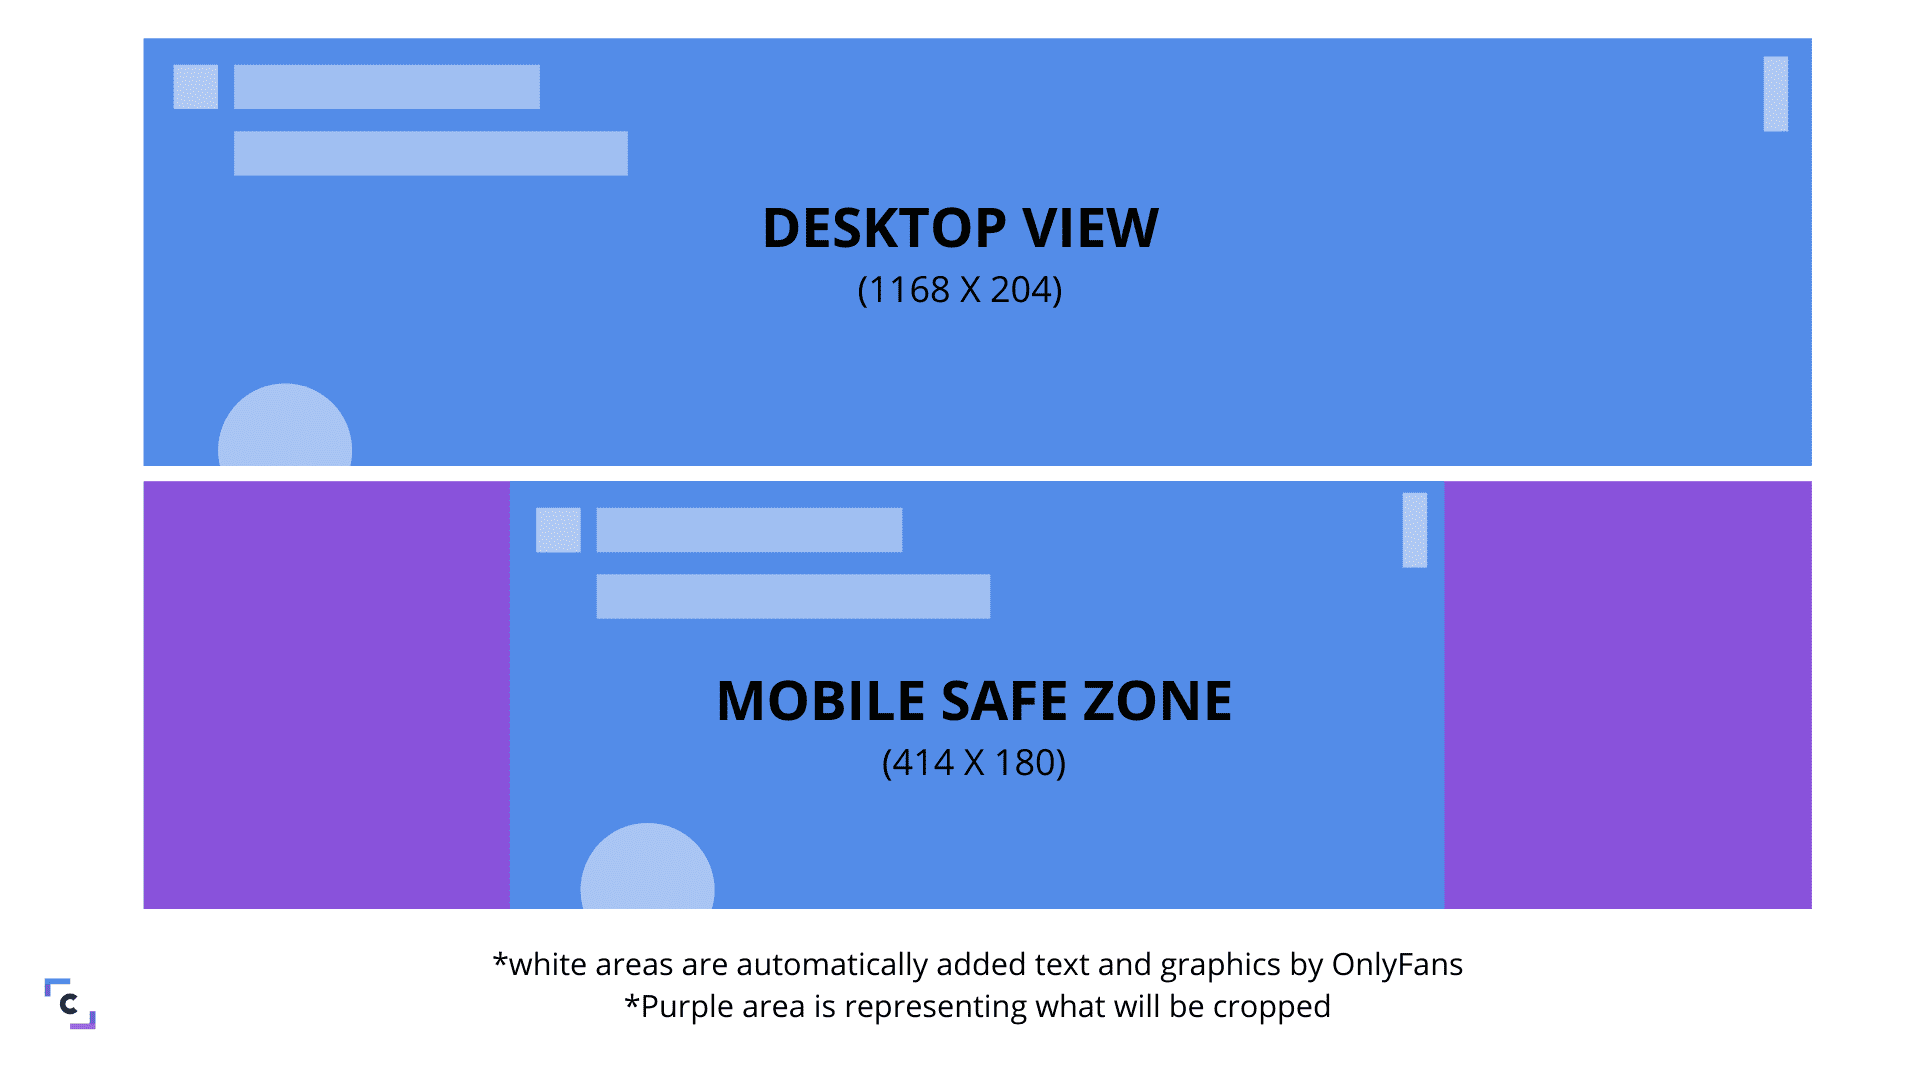
Quick Tip: Although there is no App version of OnlyFans as of 2021, many people still view OnlyFans on browsers through their phones. This means that the dimension of the banner will be distorted on mobile phones. On desktop it is 1168 width by 204 height. On a mobile phone the space in the middle 414 width x 180 height is all that will be seen. So keep in mind when designing your Banner that the center area is what you want to make sure contains the images you want all potential customers to see. This is one of the few visuals you get in front of your OnlyFans paywall and what will help make someone decide if they want to follow your page or not.
Banner: You want to create this image in an Application like Canva and then download it to OnlyFans. You can resize it in Canva but I prefer using an photo re-sizer app itself as when it comes to Promoting your OnlyFans you will need to resize a lot of images in the future. You can also grab your banner from a site like Twitter and resize it.
4. Write Your Description – 1 Minute
Quick Tip: You Only have a 1000 character limit when it comes to OnlyFans. I believe in this case, less can be more because very few characters are seen without having to click ‘more info’. For many people they stuff as many words as they can in a bio. I say hit people with two or three words they will remember at the top of the bio, or something clever.
Examples:
- SEXY 19 FLEXIBLE
- ALWAYS ON HERE
- BF DUMPED ME
- HIT ME UP
- I LOST MY CLOTHES – Help me Find them?
Writing out your bio description shouldn’t take you long as you are just starting out. With 1000 characters you can fill it out fully later with full descriptions or be witty.
5. Pick Your Link – 1 minute
Quick Tip: OnlyFans only gives you one hypertext link you can use in your profile. You can never drop links under your messages so use this link wisely. I suggest using a linktr.ee type link that displays your other pages or repeat a second Amazon.com Wish List.
Link: After deciding what link you want to use add it to your profile.
6. Add Your First Post and Pin it – 2 minutes
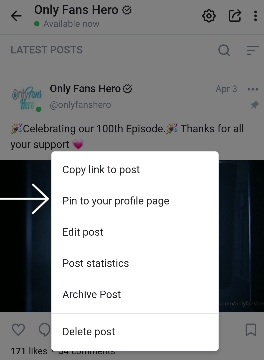
Quick Tip: It’s highly advisable if you are going to start a Paid OnlyFans page right away to ‘bank content’ on the site. So at this point you should have content you plan on front loading onto the site. Many new creators don’t know that you can pin a post to the top of your profile. Some creators use a Tip Menu or a video for this post. I advise using a video that introduces you to your subscribers where you talk and look directly at the camera. Remember that OnlyFans is a site about connection and interaction. You want to give your subs this kind of video right out front to differentiate yourself from the free videos they can find all over the web.
First Post: Create the Post, either picture, video or audio and pin it to the top of your profile.
7. Set the price for Your OnlyFans Page – 1 minute
QuickTip: If you are just starting out out you can keep your price at $Free, you don’t need to start charging right away. You can also setup discounts for a certain number of new subscribers that can bring the minimum monthly subscription price (which is $5) below that amount.
Choose Your Subscription Price: You can get this done by going to Settings and then clicking on ‘Subscriptions and Bundles” you’ll be able to set your monthly price on your account. You can adjust this price as you go along but keep in mind that the price is not retroactive so you’ll have to wait 30 days for those currently subscribing to have to pay the new adjusted price.
Your OnlyFans Page Can Be Easily Created in Less than 10 Minutes
After you’ve created your page you are going to want to look at our guides on OnlyFans Promotion as Well as Our How to Guide on How OnlyFans works. OnlyFans can be a very profitable site if you know how to promote and market it properly.
Of course if you need help gaining more fans you can reach out to me directly @OnlyFansHero on Twitter or email richard@seobounty.com.
If you’re new to OnlyFans and want to support our site you can click here to Sign Up to OnlyFans . Disclosure: SEO Bounty will earn a commission if you sign up via our link.